Overview
Nero is a complete Windows based multimedia suite developed by the German company, Nero AG. Nero enables you to create, rip, copy, burn, edit and share all your digital creations as well as rip, burn, edit and play DVDs and Blu-ray Discs. The latest Nero 2015 even brings more amazing features like streaming videos to any iOS & Android device and Burn files straight from your smartphone(Nero AirBurn). Nero makes 4 main products including in Nero: Nero Platinum, Nero Classic, Nero Burning ROM and Nero Video.
If you’ve ever used Nero in Windows computer, you probably still want to run it in Mac computer if you are now with Mac OS X. It’s a pity, however, there is no Nero for Mac version yet. Then how to manage media, burn disc, edit, rip and convert videos, DVDs in Mac? Don’t worry, it’s that easy with a Nero for Mac replacement. This article introduces the best Nero for Mac alternative to help you do what Nero lets you do and do what Nero can’t let you do. The Nero for Mac alternative working for all OS X system including macOS Monterey, Big Sur, macOS Catalina, macOS 10.14 Mojave, macOS 10.13 High Sierra, macOS 10.12 Sierra, OS X El Capitan 10.11, Yosemite 10.10, Mavericks 10.9, Mountain Lion 10.8, Lion 10.7, Snow Leopard 10.6, Leopard 10.5.
Introduces the best Nero for Mac Alternative
Wondershare UniConverter (Video Converter Ultimate) for Mac is considered as the best Nero for Mac alternative and replacement that can replace all Nero versions like Nero 2018, Nero 9, Nero 8, Nero 7, Nero 6, Nero 5 in macOS. It is a complete all-in-one video toolbox to convert, edit, enhance, download, burn, organize, capture, and play any videos on your Mac.
Key Features:
- Rip & Convert
The Nero similar for Mac can Rip CDs, DVDs and Blu-rays and convert video files in 159 formats to any format and devices including iPad, iPhone, iPod, Apple TV, Android smartphone or tablet, XBOX, Sony Playstation, PS Vita or other device. - Burn & Archive
With the help of Nero for OS X, you can easily burn your favorite homemade videos into personalized, fantastic-looking DVDs and enjoy them on the big screen or share to others. - Create & Edit
The Nero for Mac elevates your video entertainment experience to the next level! The built-in video editor comes with a set of powerful, easy-to-use editing tools like trim, crop, merge, effect, adjust, watermark, subtitle, etc. You can transform your videos into a masterpiece with just a few clicks. - Play & Stream
This Nero for Mac replacement is a universal media player which can play videos in any format shot from Camera, mobile phones, etc. as well as wireless transfer videos on to your Apple and Android devices without any USB cables to play on the go. - One-Click Online Video Downloader
Download online videos directly from YouTube and other popular sites in just one click. Save them on your computer or convert them for playback on any portable device. - 4K UHD and 3D support
- 30X faster than any other converters
- Support High Fidelity HEVC/H.265 Video input and output
- Nero for OS X/macOS
Nero for Mac is fully compatible with Mac OS X 10.4(Tiger), 10.5(Leopard), 10.6(Snow Leopard), 10.7(OS X Lion), 10.8(OS X Mountain Lion), 10.9(OS X Mavericks), 10.10(Yosemite), 10.11(EL Capitan), macOS 10.12 Sierra, 10.13 macOS High Sierra, 10.14 macOS Mojave, Catalina, Big Sur, 12 Monterey.


How to use Nero for Mac to burn DVD discs in Yosemite/Mavericks/Mountain Lion, etc.?
Prepare: Download and launch Nero for Mac
Download Nero for Mac – Wondershare Video Converter Ultimate for Mac. After download is finished. Install and launch it.
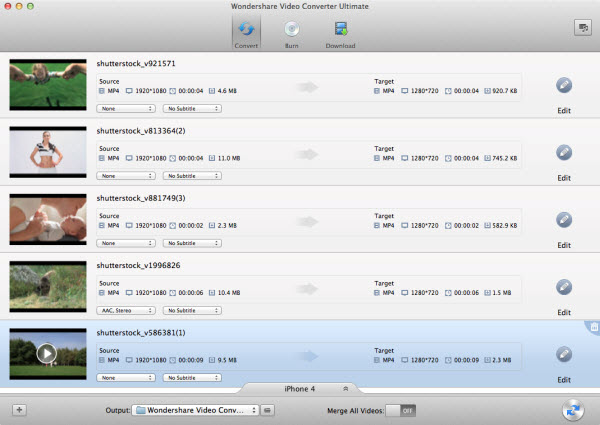
Step 1: Import Video or DVD files
Press on the “Burn” tab at the top to enter into the “Burn” interface. Switch to the “Burn DVD” option in the upper-left corner of the interface. Then simply drag and drop the files you want to the application’s pane to respectively burn DVDs.
Step 2: Choose an output format
Name your DVD and choose one of four output formats: DVD Disc, DVD Folder, .dvdmedia, or ISO file.
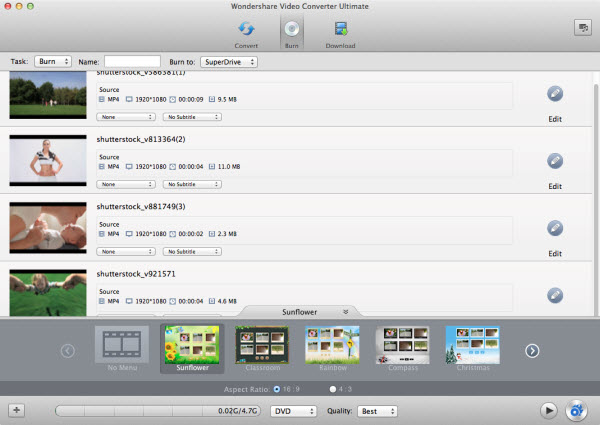
Step 3: Start burning DVDs
Click the “Burn” button in the lower-right corner of the interface to start burning DVDs.
Editors’ note: This article Nero for Mac has been published on Nov 14, 2014 and has been updated on July 29, 2018.