Overview
Along with the release of OS X 10.9 Mavericks, Apple also updated its popular entry-level video editor, iMovie to iMovie 10 with major changes to the interface to make it easier to import video, create and share your videos. And along with the release of macOS 10.14 Mojave, macOS 10.13 High Sierra, macOS 10.12 Sierra, OS X EL Capitan, OS X Yosemite 10.10, Mavericks 10.9, Apple Inc. launched the stable version iMovie 10 which bundled with all new Macs and for separate purchase from the Mac App Store.
With iMovie 10, import is fast and really a joy. You can choose to importing from a camcorder, importing from an iOS device, importing from a point-and-shoot camera and importing existing movies. And the import process in iMovie 10 has now been back-grounded, meaning that you don’t need to wait for an import to complete before working with the footage. You can select, mark as Favorite and add to your movie before the file has even copied.

However, video importing in iMovie 10 is still restricted to Apple friendly video formats including MP4, MOV, M4V. By the feature of importing video from a camcorder in iMovie 10, you can import most video to iMovie 10 from camcorder in MTS, MXF, XAVC. But there are times you cannot import video to iMovie 10 even it is in Apple friendly MP4, MOV, M4V, and even it is from Camcorder.
Since iMovie 10 only imports MP4, MOV, M4V files that are encoded with MPEG4/AAC or H.264/AAC data, if the MP4, MOV, M4V files are not encoded with iMovie support codec and if files are in MKV, FLV, AVCHD MTS, MXF, XAVC other than MP4, MOV or M4V format, iMovie 10 will refuse to import.
In order to successfully import all kinds of MP4, MOV, WMV, MKV, FLV, AVCHD MTS, MXF, XAVC files to iMovie 10 in Mavericks, a recommended solution is to convert iMovie unrecognized video format to iMovie 10 supported video format.
This article introduces an easy step-by-step guide on how to convert to import MP4, MOV, WMV, MKV, FLV, AVCHD MTS, MXF, XAVC, etc. to iMovie 10 in Mojave/High Sierra/Sierra/El Capitan/Yosemite/Mavericks for Editing.
Steo-by-Step Guide on how to Import AVI, MP4, MOV, WMV, MKV, FLV, AVCHD MTS, MXF, XAVC, etc. to iMovie 10 in El Capitan/Yosemite/Mavericks
Prepare: Download iMovie Converter for Mac. Install and launch it.

Step 1: Add video to the program
Press “Add Video” button to import your video files. Or you can also drag your files directly to the main interface of the program.

Step 2: Set iMovie 10 supported video format
Click the drop-down button on the right side of the “Profile” button to select iMovie 10 supported video format like “MP4 MPEG-4 Video(*.mp4)” or “H.264/MPEG-4 AVC Video(*.mp4)” from the “General Video” category.
To convert HD MP4, MXF, MTS, HD MKV to iMovie 1080p video, select “HD H.264 Video(*.mp4)” or “HD MP4 MPEG-4 Video(*.mp4)” from the “HD Video” category.
Step 3: Convert MP4 to iMovie 10 supported video
Click “Convert” button to begin converting your video files to iMovie 10 supported video format.
Step 4: Import video AVI, MP4, MOV, WMV, MKV, MXF, MTS, etc into iMovie 10 in El Capitan/Yosemite/Mavericks
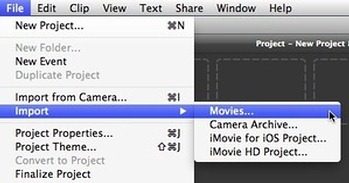
Launch iMovie, and choose File > Import > Movies…. Then navigate to the folder where your converted video file is located and select (highlight) the converted MP4 file. Create a new event and click “Import” button.
Related Articles
iDVD Replacement for El Capitan/Yosemite/Mavericks
Can QuickTime X Play AVI, WMV, FLV, MKV, DivX in Mac?
How to Download YouTube MP4 1080p/720p/4K Video in Mac?